
Introduction
Install blinds – Installing window blinds is a practical and stylish way to enhance privacy, control light levels, and add a decorative touch to any room. Whether you’re a seasoned DIY enthusiast or tackling this project for the first time, this comprehensive guide will walk you through the steps to achieve a flawless installation. With the right tools and techniques, you can transform your windows with professionally installed blinds in no time.
Tools and Materials You’ll Need
Before you begin, gather the following tools and materials:
- Window Blinds: Measure your windows beforehand to ensure you purchase blinds of the correct size.
- Mounting Brackets: Typically included with your blinds, these secure the blinds to the wall or window frame.
- Screws: Check the instructions to determine the appropriate size and type of screws needed.
- Power Drill or Screwdriver: For drilling pilot holes and securing screws.
- Level: Ensures that your blinds are installed straight and level.
- Measuring Tape: Essential for accurately measuring window dimensions and blind placement.
- Pencil: To mark where you’ll drill pilot holes and mount brackets.
- Step Ladder: Depending on the height of your windows, a step ladder may be necessary for safe installation.
- Safety Glasses: Protect your eyes when drilling or handling materials.
Step-by-Step Installation Guide
Prepare Your Workspace
Clear the area around the window to provide ample space for installation. Lay out your tools and ensure all necessary components are readily accessible.
Measure and Mark
Using a measuring tape and pencil, mark the positions where the blinds will be installed. Typically, brackets should be placed evenly on both sides of the window frame or wall. Use a level to ensure your markings are straight and even.
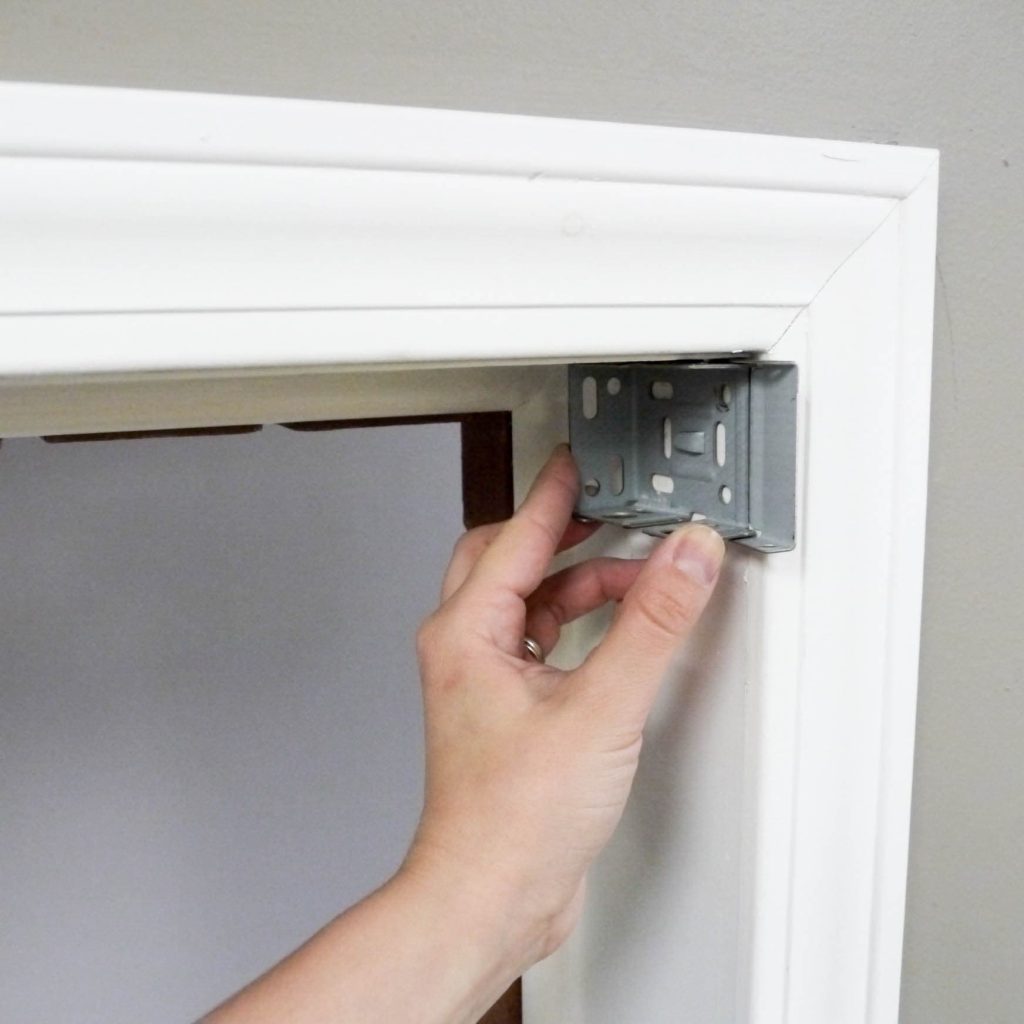
Install Brackets
Hold each bracket in position and mark the locations for pilot holes using your pencil. Drill pilot holes at the marked spots to prevent splitting the wood or damaging the wall. Secure the brackets in place using screws and a screwdriver or power drill. Ensure brackets are firmly attached and level.
Attach Valance (if applicable)
If your blinds come with a valance (decorative cover), attach it to the headrail according to the manufacturer’s instructions. This step is typically straightforward and involves snapping or sliding the valance into place.
Install the Blinds
Insert the headrail of the blinds into the brackets. Depending on the style of your blinds, you may need to lift or snap them into place. Once securely mounted, test the blinds by pulling the cord or adjusting mechanism to ensure smooth operation.
Make Adjustments
Check that the blinds are level and adjust if necessary. If your blinds include a cord or wand for tilting the slats, ensure it functions properly and adjust the slats to your desired angle.
Secure Cords and Safety
For blinds with cords, it’s crucial to secure them properly to prevent entanglement, especially if you have children or pets. Use cord cleats or tension devices to keep cords out of reach and safely secured.
Final Touches
Once installation is complete and you’re satisfied with the placement and functionality of your blinds, clean up any debris and admire your handiwork! Enjoy the enhanced privacy, light control, and aesthetic appeal that your new blinds provide.
Tips for Success
- Measure Twice, Install Once: Double-check your measurements and markings before drilling.
- Use a Level: Ensures your blinds are installed straight and aligned with the window frame.
- Follow Manufacturer Instructions: Each blind style may have specific installation steps and requirements.
- Safety First: Use appropriate safety gear when handling tools and materials.
Pre-Installation Preparation
Before diving into the installation process, gather the necessary tools and materials:
- Tape measure
- Pencil
- Level
- Drill
- Screwdriver (both Phillips and flathead)
- Brackets and screws provided with the blinds
- Safety glasses
- Ladder or step stool
Accurate Measurement
Accurate measurements are crucial for a perfect blind fit:
- Measure the width of the window frame in three places—top, middle, and bottom. Use the narrowest measurement for inside mount blinds. For outside mount, add a few inches on each side to ensure full coverage.
- Measure the height from the top of the window frame (or desired mounting location for outside mounts) to the sill in three places—left, center, and right. Use the longest measurement.
Choosing the Right Blinds
Select blinds that complement your interior design and meet your functional needs:
- Material: Wood, faux wood, aluminum, or fabric? Each has its aesthetic and durability characteristics.
- Light control: Do you prefer room-darkening, light-filtering, or sheer?
- Operation: Cordless options provide a safer environment for children and pets.
Mounting Options
Decide between inside mount (blinds fit within the window frame) or outside mount (mounted on the wall surrounding the window):
- Inside mount provides a clean, streamlined look but requires precise measurements.
- Outside mount is more forgiving for irregular windows and can make windows appear larger.
Installation Steps
Mark and Install Brackets
- Inside Mount: Position brackets inside the window frame according to manufacturer’s guidelines, ensuring they are level. Mark bracket locations and drill pilot holes before screwing in the brackets.
- Outside Mount: Measure and mark where the top of the blind will sit, typically 2-3 inches above the window frame. Use a level to mark the spots for brackets, drill pilot holes, and attach brackets securely.
Assemble and Hang the Blinds
- Attach the Valance: If your blinds come with a valance, attach it to the headrail before hanging the blinds.
- Hang the Blinds: Carefully lift the blind onto the brackets, making sure it clicks or locks into place securely.
- Final Adjustments: For corded blinds, ensure the cords hang evenly and use a cord cleat to secure them at a safe height. For cordless blinds, test the mechanism to ensure smooth operation.
Finishing Touches
- Trim any excess cord or fabric if needed, following safety guidelines.
- Test the blinds’ operation fully, adjusting slats to check for proper alignment and light control.
Safety Considerations
- Always follow the manufacturer’s instructions for installation and operation.
- When working with power tools, wear safety glasses and take necessary precautions.
- Keep cords out of reach of children and pets; consider upgrading to cordless options.
Additional Tips for Installing Window Blinds
- Choose the Right Mounting Surface: Ensure that the surface where you’re installing the brackets can support the weight of the blinds. For drywall, use anchors if necessary to provide extra support.
- Consider Inside or Outside Mount: Determine whether you’ll mount the blinds inside the window frame (inside mount) or outside the frame on the wall (outside mount). Inside mounts provide a sleeker look, while outside mounts can make windows appear larger.
- Account for Clearances: For inside mounts, measure the depth of your window frame to ensure there’s enough space for the blinds to operate freely without obstruction.
- Cut Blinds to Fit (if necessary): Some blinds may need to be trimmed to fit narrower windows. Follow manufacturer instructions carefully if cutting is required to avoid damaging the blinds.
- Check for Obstructions: Ensure there are no obstructions such as window handles or locks that could interfere with the operation of the blinds once installed.
- Test Operation Before Finalizing: Before finishing the installation, test the blinds thoroughly by opening, closing, and adjusting the slats to ensure everything functions smoothly.
- Consider Child Safety: If you have young children or pets, opt for cordless blinds or ensure that cords are properly secured and out of reach to prevent accidents.
- Maintain Consistency: Install blinds at consistent heights across multiple windows in the same room for a uniform appearance.
- Seek Professional Help if Unsure: If you’re unsure about any part of the installation process or if dealing with unusual window shapes or sizes, don’t hesitate to consult a professional installer.
Troubleshooting
- Blinds Won’t Fit: If the blinds are too wide for your window frame, consider an outside mount or check if trimming is an option per manufacturer guidelines.
- Uneven Blinds: If the blinds appear uneven after installation, double-check bracket placement and make adjustments as needed.
- Difficulties in Operating: Ensure that brackets are securely fastened and that the blinds are properly aligned within the brackets to allow smooth operation.
By following this step-by-step guide and utilizing the right tools, you can confidently install window blinds like a pro. Whether you’re updating a single window or transforming an entire room, the satisfaction of a perfectly installed set of blinds awaits. Happy DIY-ing!