Introduction
When it comes to securing your home, the installation of a ring doorbell mounting bracket is a critical step. The Ring doorbell is popular for its ability to enhance home security, providing real-time monitoring and video recordings of your front entrance. However, the effectiveness of this device heavily relies on proper installation, which begins with choosing the right mounting bracket. This guide will provide you with essential tips and tricks for installing your Ring doorbell bracket effectively, ensuring it functions optimally.
The right mounting bracket not only secures your video doorbell but can also enhance its performance. By following these guidelines, you can ensure a seamless installation process that maximizes the security benefits of your Ring doorbell.
Understanding the Ring Doorbell Mounting Bracket
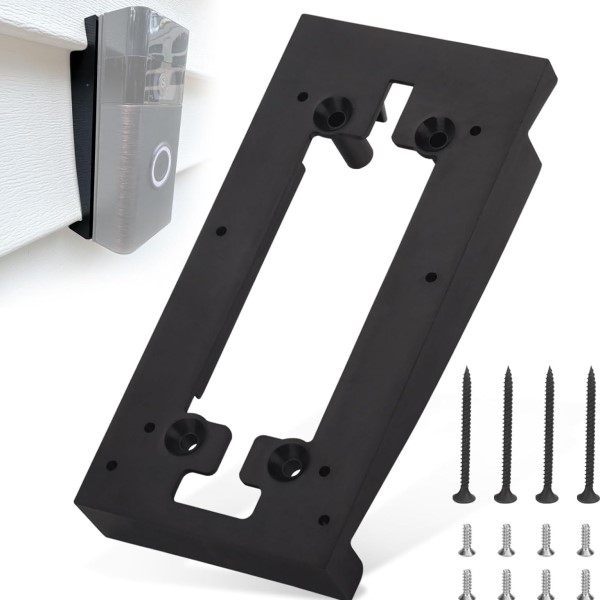
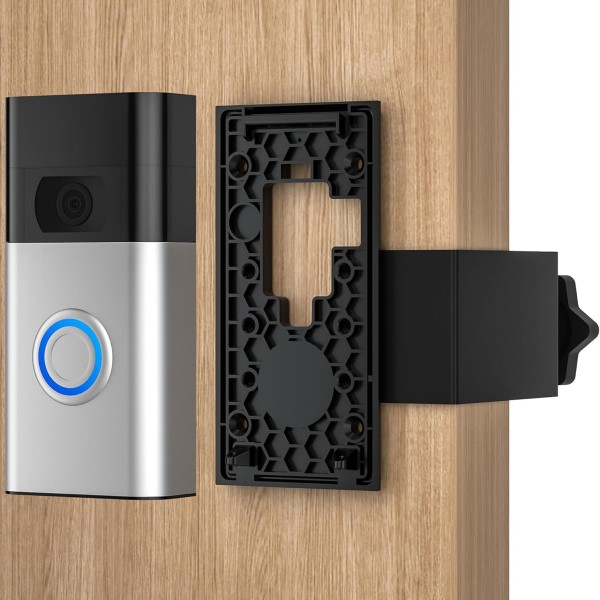
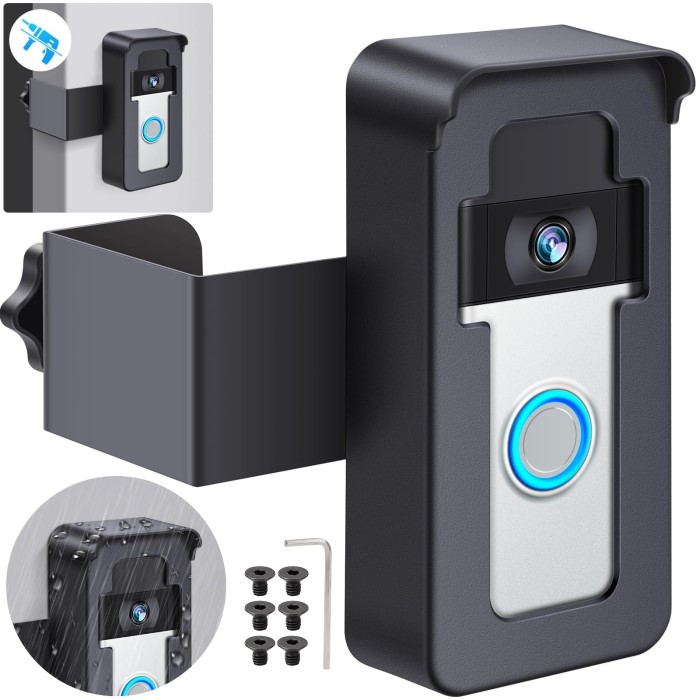
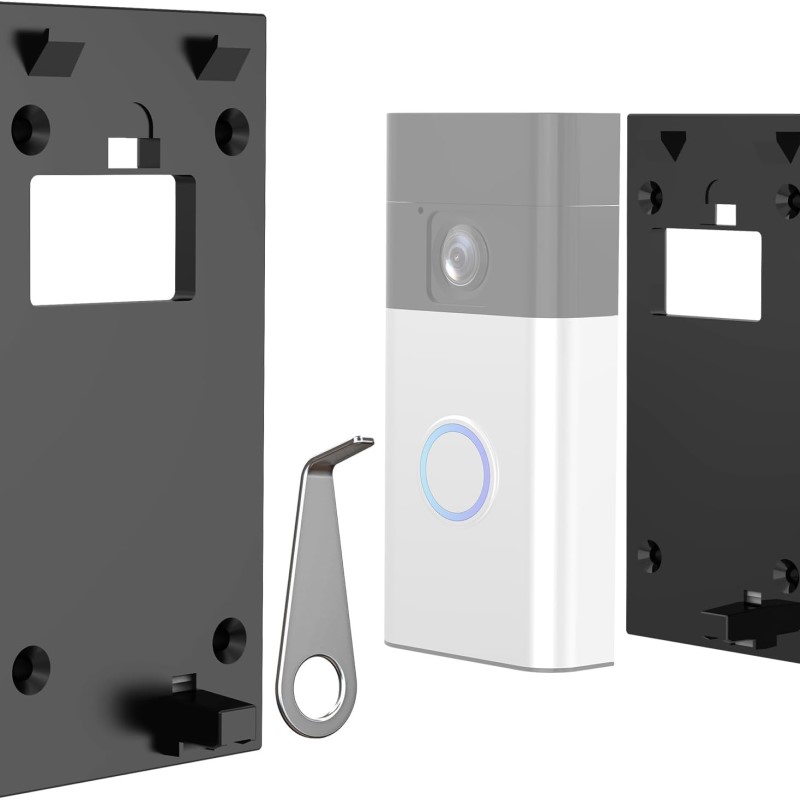
The mounting bracket is a vital component designed to hold your Ring doorbell securely in place. Here are several aspects to understand:
- Design and Compatibility: Ring doorbell mounting brackets come in various designs tailored to different Ring models. Ensure that the bracket you select is compatible with your specific model to guarantee proper fit and function.
- Material Quality: Most brackets are made from durable materials like weather-resistant plastic or metal. A high-quality bracket will withstand outdoor elements, such as rain and wind.
- Adjustability: Some mounting brackets allow for tilt or swivel adjustments. This adjustable feature enables you to angle the camera for optimum visibility, ensuring you capture the widest view possible of your entryway.
- Ease of Installation: Many brackets are designed for simple installation. Look for those that come with mounting hardware and clear instructions to make the setup process smoother.
- Aesthetic Appeal: Consider how the mounting bracket will look on your wall. Some designs offer clean lines and colors that match your home’s exterior, contributing to an elegant appearance.
By understanding these features, you can select the right mounting bracket that meets both functional and aesthetic needs.
Benefits of Using a Mounting Bracket
Investing in a proper mounting bracket for your Ring doorbell can provide several benefits:
- Enhanced Stability: A sturdy mounting bracket ensures that your Ring doorbell remains securely in place. This stability prevents the device from shifting or falling, which could interrupt its functionality.
- Optimal Viewing Angle: The right bracket allows for precise positioning of your doorbell camera. With accurate placement, you can minimize blind spots and capture better video footage of visitors.
- Improved Weather Resistance: A quality mounting bracket can help protect the doorbell from weather damage by keeping it securely mounted and reducing exposure to harsh elements.
- Increased Security: Proper installation of the mounting bracket enhances overall security. A secure doorbell is less likely to be tampered with or stolen.
- Easier Use of Features: A well-placed doorbell allows for better utilization of features, such as motion detection and two-way communication, improving your home security experience.

Installation Tips for Your Ring Doorbell Mounting Bracket
Installing your Ring doorbell mounting bracket may seem straightforward, but careful attention to detail ensures a successful setup. Here are essential tips for installation:
- Gather Necessary Tools: Before starting, collect all necessary tools, including a screwdriver, drill (if needed), level, and a measuring tape. Having everything at hand streamlines the installation process.
- Choose the Right Location: Select a location for the doorbell that allows for a clear view of your entryway. Ideally, the mounting height should be around 48 inches from the ground. This height provides an optimal angle for both video capture and user interaction.
- Use a Level for Accuracy: Before fastening the mounting bracket, use a level to ensure that it’s straight. This step helps prevent misaligned installations, providing better video angles.
- Secure the Mounting Bracket: Following the instructions provided in the package, attach the mounting bracket securely using the screws and anchors. If mounting to brick or concrete, make sure to use appropriate anchors to ensure stability.
- Attach the Ring Doorbell: Once the bracket installed, carefully attach the Ring doorbell to the bracket according to the manufacturer’s instructions. Ensure it clicks into place securely.
- Check for Functionality: After installation, test the doorbell to ensure it powers on and connects to your home Wi-Fi. Check for proper function by viewing the live feed and testing motion detection.
Common Issues During Installation and Their Solutions
During the installation of your Ring doorbell mounting bracket, you may encounter common challenges. Here are solutions to address them:
Misalignment Problems
- Identifying Misalignment: If you notice that the Ring doorbell is not positioned correctly—perhaps it appears crooked or off-center—this indicates a potential misalignment issue. Proper alignment is crucial for optimal functioning and aesthetics.
- Re-checking Bracket Positioning: Start by examining the positioning of the mounting bracket. Use your measuring tape to ensure the bracket is placed at the correct height and in the right location.
- Utilizing a Level Tool: To guarantee that the bracket is level, use a spirit level tool. Place it on top of the bracket to see if it is straight. Adjust it accordingly until it is perfectly level.
- Securing the Bracket Again: After making adjustments, securely fasten the screws to hold the bracket in place. Make sure not to overtighten, as this could strip the screws. Double-check alignment one more time before finalizing the installation.
Loose Mounting
- Recognizing Loose Mounting: If the mounting bracket feels loose to the touch or allows the doorbell to wobble. This is a sign that it has not been properly secured. A loose installation can lead to operational issues or the device falling off.
- Testing the Stability: After tightening, gently wiggle the doorbell to test its stability. If it still feels loose, further adjustment is necessary.
- Using Stronger Anchors: If issues persist, consider using stronger anchors. Especially if the doorbell mounted on a tough surface like brick or concrete. Heavy-duty wall anchors provide additional support for ensuring a secure fit.
Inconsistent Power
- Power On Verification: If the Ring doorbell does not power on after installation, begin troubleshooting by verifying whether the device is receiving power at all.
- Double-Checking Connections: Examine all connections and wiring if applicable. Ensure that all wires securely connected to the device and that terminals are free from corrosion or damage.
- Charged Device Check: For battery-operated models, confirm that the battery charged. If the battery has been in use for some time, replace it with a fully charged one to restore power.
- Wiring Inspection for Hardwired Models: If your model uses hardwiring, confirm that the wiring correctly connected to the power supply. An incorrect setup could prevent the doorbell from receiving electricity.
Connectivity Issues
- Identifying Connectivity Problems: If your Ring doorbell is failing to connect to Wi-Fi, it can impact its performance significantly. Proper internet connectivity is essential for notifications, video streaming, and configuration.
- Moving the Router: Start by checking the distance between your Ring doorbell and the Wi-Fi router. If the signal is weak, consider moving the router closer to improve connectivity.
- Adjusting Wi-Fi Settings: Review your Wi-Fi settings to ensure compatibility with the Ring doorbell. Sometimes, settings like MAC address filtering can prevent the device from connecting.
- Rebooting the Doorbell: If connection issues persist, try rebooting the Ring doorbell. Turn it off and then turn it back on to refresh its connection to the Wi-Fi network.
- Checking the App Settings: Within the Ring app, check for any specific settings that may hinder connectivity. Update the app if a new version is available and follow any recommended troubleshooting steps provided in the app.
FAQs about Ring Doorbell Mounting Bracket
Do I need a mounting bracket for my Ring doorbell?
Yes, a mounting bracket is typically needed to securely install your Ring doorbell. It ensures stability and optimal placement for functionality.
How do I attach the Ring doorbell to the bracket?
After installing the bracket according to the manufacturer’s instructions, position the Ring doorbell directly onto the bracket. Push down until it clicks into place securely.
Why are people getting rid of Ring doorbells?
Some users may decide to remove their Ring doorbells due to privacy concerns, issues with connectivity, or personal preference. Additionally, installation challenges can lead some to seek alternative solutions.
How can I secure a Ring doorbell to a wall?
To secure a Ring doorbell to a wall, use the appropriate mounting bracket and screws. Ensure the screws tightened and that the bracket correctly anchored, especially on harder surfaces like brick or concrete.
Conclusion
In conclusion, understanding the significance of the ring doorbell mounting bracket is essential for anyone looking to enhance their home security. A proper installation not only ensures stability and functionality but also maximizes the performance of your Ring doorbell.
By following the installation tips provided in this guide, addressing common issues proactively, and utilizing the answers to frequently asked questions, you will be well-prepared to secure your Ring doorbell effectively. Investing time in the correct installation will enhance your home’s safety and convenience, giving you peace of mind about your security setup. Make the most of your Ring doorbell by ensuring it is installed properly with the right mounting bracket!